#between the fullscreen ones and the bordered ones
Explore tagged Tumblr posts
Visit Tumblr Blog
Explore Tumblr blogs with no restrictions, modern design and the best experience.
Last Seen Tumblr Blogs


Fun Fact
Premium Tumblr themes are available from anywhere between $9 to $49.
Photo


A quick summary of the 50 turn mario party if you couldn’t sit and watch a 4 hour video
#Rooster Teeth#Achievement Hunter#Meg Turney#Gavin Free#Michael Jones#Lindsay Jones#AH edit#AH gifs#Achievement Hunter Gifs#Let's Play#scheduled post#sheepygifs#these are terrible I couldn't get the sizes to match up well#between the fullscreen ones and the bordered ones
2K notes
·
View notes
Photo

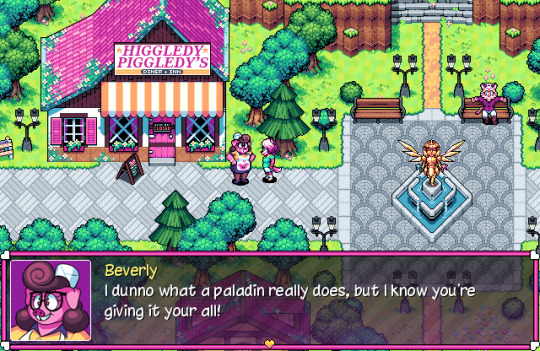


Melody Amaranth is a kindhearted but meek transgender fox from the small town of Greenridge. Recently, she made two important realizations about herself. One: she's deeply in love with her adventurous best friend, Allison Goleta. (The feeling was mutual.) And two: if Allison has her heart set on becoming an adventurer, then maybe Melody could join her. As a healer.
It all seemed perfect.
And then things got weird.
The Super Lesbian Animal RPG demo update is out now!
Version 2.0 covers the same portion of the game as the original demo (roughly an hour of the game, letting you explore Greenridge and fight your way through the first dungeon) but now features enhanced music, improved battle UI based on player feedback, some art tweaks, brand new sound effects and jingles, a smattering of balance changes, and most importantly, a new major NPC to meet: Allison’s coworker Paula the polar bear!
Of course, if you're sitting out the demo and/or this update in favor of waiting for the full game, we're still hard at work on that! We've made a lot of progress, and we think SLARPG is really shaping up to be something special
Full changelog below the break:
NEW CONTENT
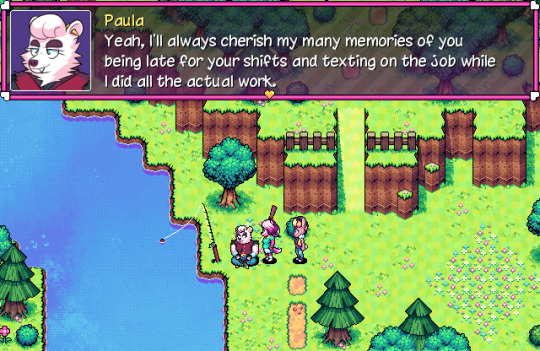
New NPC - Paula!
Can be talked to on the Hiking Trail after Allison joins the party. You literally can't miss her. If you've already played the demo and just want to make a beeline for the one new scene, that's it
Brief new bit of dialogue added when you inspect the scenic view at the top of the Hiking Trail with Allison in the party
SOUND
Sound effect overhaul! Many sounds were holdovers from SLARPG's 2013 predecessor, which have now been replaced. The punches are punchier, the magic is magic-er. (Most of the little menu blips were done specifically for SLARPG, though, so those are mostly the same.)
Updated music! Some tracks received simple mixing and mastering updates, while others have very noticeable changes
A new song! The battle with the Hole Hound now uses a new battle theme from lead composer Beatrix Quinn, primarily used in the Amber Woods area in the full game
Several brand new jingles for things like finding treasure and solving puzzles. They add a lot of personality to the game, I think
GRAPHICS
New non-blurry fullscreen mode!
F5 toggles between fullscreen and windowed modes, F6 changes display size
The game also now remembers your display preferences upon launching
Fair warning--maximizing the display size literally just stretches the pixels as big as they'll get on your screen. This will likely give you some really janky, uneven pixels on most average displays. For a 1080p screen, I'd personally stick to the 2x zoom. But I'm not your boss or anything
Major areas such as Greenridge and the Basement Dungeon now have unique title card graphics that pop up upon entering
Various minor tweaks
Touched up party member sprites (Allison's collar has grown even poofier)
Slightly touched up some of the cutscene illustrations
New tree sprites in Melody's starting area
New water graphics, visible on the Hiking Trail
You can see the Amber Woods in the distance at the top of the Hiking Trail
Allison now owns a fightstick (this is an important character trait)
GAMEPLAY
Battle UI update
Whether skills cost MP or Star Power is now clearly labeled in the menu
Star Power gauge has a new color scheme at 100% that stands out more. It has a rainbow border. It's good
A cursor now appears when selecting which allies to use skills/items on. It's a little heart. It's good
Increased the opacity of the battle log at the top of the screen to make it more readable
Various other visual tweaks
Status effect update
Status effect animations! Enemies afflicted by statuses such as Burn now show simple animations to more clearly indicate their statuses at a glance
Status effects are now calculated more accurately. Due to a faulty third party script, statuses that were supposed to heal or do damage every turn based on the caster's stats were instead using the target's stats. In most cases, this means the effects have been buffed
"Resolute Damage" has been renamed to "Resolute Seal"
Balance tweaks
All party members now receive somewhat greater stat boosts with every level to make each level up feel more meaningful
Allison's Left Jab, Right Jab, Low Kick, and High Kick have all received buffs so that they don't feel like a waste of Star Power as soon as you learn stronger attacks
The Star Power cost of Allison's Divebomb ability has been reduced from 60% to 40%
Dust Bunny, Flaming Dust Bunny, and [secret miniboss] have received a slight attack power buff
Equipment tweaks
The "Accessory" equipment slot has been replaced with the Charm slot
Basic Pauldrons have been renamed to Generic Brand Pauldrons and moved to the Body slot
Iron Gauntlets weapon changed to Iron Gauntlet (singular) so that if you dual wield them later in the full game you aren't equipping four gauntlets. That would just be silly, and everyone knows this is a very serious game
Misc.
Allison and Claire will now get their Easy Mode buffs automatically if Easy Mode is already activated when they join the party
Fixed a few glitches related to turning out the lights in the Basement Dungeon
Removed "Exit Game" option from the in-game Options menu and added buffer around "Return to Menu." Hopefully this will prevent players from accidentally quitting without saving. I'm sorry that it doesn't ask you to confirm before quitting. Blame Yanfly
Various other minor tweaks
1K notes
·
View notes
Text
COLD updates
It’s been a while since I’ve posted anything about this, mainly because I’ve been making small incremental changes and fixes rather than big system reworks, and twitter works way better for that kind of thing.
That said, twitter’s character limits are a pain in the ass, and pretty much limit my posts to “lel look at this amusing feature“. Here’s a more detailed description of the stuff I’ve been doing.
Probably the largest change I’ve made has been around weapon reloading.

Tumblr’s gif size limits don’t display it very well, but as shown above, when in fullscreen the weapon interface is very far away from the center of the screen. This is an issue, as it means that to see the status of your weapons you have to completely take your focus off your character, which could easily lead to death.
So, the solution is to put the most important parts of the interface around the focus of the player’s attention right? Yeah, in fact there are already examples of this in the game, like how the player is more or less on fire depending on their health.
This has problems as well though, as cluttering up the area of the player’s focus can also be an issue. My first attempt to strike a balance between these two extremes came out as follows.

The cursor is also a significant area of focus for the player, so positioning some stuff around that can also be useful. The yellow fill in the circle shows firing cooldowns, while the little gems around it each represent a weapon, with the one directly above the cursor being the currently selected one. If it’s coloured, it’s not reloading, and the grey border shows whether it’s ready to fire or not.
I’m hoping this will be sufficient, but I’m not going to know for sure until I can get some testers in. Who knows, maybe I’ll be making a similar post in the future.
Also related to weapons,

you can hold down the reload button to reload all weapons instead of just the selected one. This is a lot less painful than scrolling through them all pressing reload.
So yeah, you can see the reasoning behind the delay when that is the largest feature.
Another large thing, that didn’t actually take long to implement at all, is rudimentary pathfinding for enemies.

Here you can see some bots being awful at getting around a wall. This kind of behaviour makes the game way too cheesable, which encourages the player to play in a boring and frustrating way.

Pictured above, bots being decidedly good at getting around a wall. Don’t worry about the extreme screen shake, they’re just also very good at destroying the player.
And, for the smaller features I implemented these badass freeform polygon walls.

And also two new weapons, the Slugger, which can be charged up to fire all its chambers at once.

And the Slave Bots, which fires a cluster of homing projectiles.

So yeah, those are the changes I’ve made since last time.
I’m probably going to do something big next, maybe implement doors or something.
I post more regularly, albeit it in less detail, on my twitter.
2 notes
·
View notes
Text
Retro Golden Age Review (Steam)

We go back in time with our Retro Golden Age Review, not content with one game we in fact get three! Goody, the original SPECTRUM action, platform, and puzzle game from the eighties, puts you in the shoes of an expert bank robber, and then we have Livingstone I Presume David Livingstone, a famous English missionary and explorer, went to Africa on a sanitary and cartographic mission to establish the Zambeza and Nile river basins when he disappeared... and finally Operation Alexandra which is an arcade video game that takes place inside an abandoned Nazi base in Alexandra Land, within the Arctic Circle, inhabited by unknown beings.
Retro Golden Age Review Pros:
- Beautiful graphics. - Three games in one - Goody, Livingstone I presume, and Operation Alexandra. - Download sizes - - Goody - 713.22MB. - Livingstone - 584.88MB. - Operation Alexandria - 678.28MB. - 36 Steam Achievements. (12 in each game) - Own in-game achievements that are different from the steam ones. - Seperate downloads and entries in your Steam library. - Full controller support. - Important note on how this came to be: This production is a partnership with the studios (Operasoft and 4Mhz) and Zerouno Games. They have provided us (Zerouno Games) with the original materials needed to start the reverse engineering process that has allowed us to develop the improvements you can find in these versions. - 80s-style opening screens. - Instruction manuals act as a tutorial. - Real-world desktop menu design. - Achievements earned are displayed as trophies on your room shelf. - The extras menu shows off original box art, scans of loading screens, and scans of the original game cassettes and floppy discs. - Two ways to play - 80s experience (no saves), and new experience. - Rewind the system for each game. - Save when you want. - Four save slots. - 3 screen types - original, no border, and fullscreen. - The rewind system creates snapshots/slides so you can be precise. - At any time you can flip the view and filters instantly. - The filters include CRT and that fuzzy one. - The manual isn't available actually in the game but it pauses and allows you to go back into your room. - Controls are shown for both keyboard and the controller. - Restart button option. - Difficult. - Each game has its own desktop layout and design. - Music for each game has two options. - Achievements pop us as they are earned in the game. - Supports both analog and d-pad controls. - Excellent nostalgia trip. - Solid controls. - Offers a mix of the original games and a more lenient version with saves and rewinding. - Excellent soundtracks. Retro Golden Age Review Cons: - Cannot rebind controls. - Takes a lot of getting used to as it is just how I remember games like this... Hard. - The rewind system is fine but a handy hold-down button would probably work better. - Difficult. - Cannot skip the opening screens. - No graphics settings. - It's a bit annoying that the games are not one package in terms of being able to jump between them. Related Post: Deceive Inc Review (PlayStation 5) Retro Golden Age: Official website. Developer: Zerouno Games Publisher: Zerouno Games Store Links - Steam Read the full article
0 notes
Text
Hogwarts Legacy Can't Change to Full-Screen Mode

If you're having trouble enabling full-screen mode in Hogwarts Legacy, you're not alone. Luckily, there are several easy solutions that you can try to solve the problem. Here are a few methods that have proven effective for players.

Unlock Full-Screen Mode in Hogwarts Legacy
Alter Game Configuration Settings One potential cause of the full-screen mode issue is the game's configuration settings. The game stores its display settings, including full-screen mode, in a file called "gameusersettings.cfg". By default, the game runs in windowed mode, but you can switch to full-screen mode by accessing the gameusersettings.cfg file located in the local app data folder for Hogwarts Legacy. Once you've found the file, open it with a text editor like Notepad, and change the value of "fullscreenmode" from 1 to 0 and "lastknown" to 0. Save the file and make it read-only to prevent the game from reverting back to windowed mode. Then, launch the game from Steam and add the "window-mode exclusive" launch option to force the game to run in full-screen mode. Also read: Marunweem Lake In Hogwarts Legacy Also read: Find Diricawl In Hogwarts Legacy Turn Off DLSS DLSS (Deep Learning Super Sampling) is a feature that uses AI to improve the game's resolution and performance. While it can enhance the game's graphics, it can also cause compatibility issues, including full-screen mode problems. To fix this, try disabling DLSS in the game's settings. Check Screen Resolution It's possible that the full-screen issue is due to your screen resolution not being set to the minimum required for the game. To resolve this, check the game's minimum requirements and adjust your screen resolution accordingly. Press ALT + ENTER A quick and easy solution for many players is to simply press ALT + ENTER on your keyboard. This shortcut switches the game from windowed mode to full-screen and vice versa. Give it a try and see if it works for you. Change Window Mode Another option is to change the window mode in the game's settings. Open the "Settings" menu, go to the "Display Options" tab, and change the "Window Mode" option to "Windowed Fullscreen". This setting will give you a full-screen experience without borders and allow you to easily switch between other applications. Also read: How To Fix Dragon Age Inquisition Launch Issues Read the full article
#HogwartsLegacy#HogwartsLegacyCan'tChangetoFull-ScreenMode#hogwartslegacyfullscreen#HowToEnableFullscreenInHogwartsLegacy?
0 notes
Text
Persona 4 golden switch

This may not be a use case many players run into, but it is frustrating-especially because Persona 4 is such a long game, it's well-suited to cloud saves letting you swap to a laptop to play away from the desk. When I played more on my desktop and loaded into a different save file on my laptop, however, the game played just fine. I couldn't tell what triggered the crash, as it didn't always happen at the same moment, but I couldn't progress more than a few minutes before crashing. On my laptop, I picked up from a save file I'd started on desktop (thankfully Atlus built in Steam Cloud support) and kept experiencing a crash within five minutes of playing. This happened three times in a row, but I was eventually able to successfully apply my changes and play the game with no issues afterwards. On my desktop, I found a recurring crash that triggered when I changed the game's resolution setting in fullscreen mode. On both desktop and laptop, I've experienced some odd and abrupt crashes to desktop with P4G. (Image credit: Atlus) There are a few issues, including crashing There's thankfully a fast-forward option for cutscenes, but I wish it didn't make a VHS tape-scrubbing noise the whole time. Disabling V-Sync, for some reason, seems to cause the limit mentioned above. Update: With V-Sync enabled, P4G can actually run up to 144 fps and above. It would've been nice to be able to lock the framerate to 144 fps on a high refresh monitor, but for a game that's mostly dialogue and turn-based combat, it's a minor quibble. On both desktops, the framerate stopped short of hitting the 130 fps mark, which seems like it might be a limitation of the game engine. On the GTX 980 desktop with the rendering resolution set to 200%, the framerate fluctuate quite a bit, from around 60 fps up to 125 fps, but I never noticed any stutter or issues from the changing FPS. I'd be fine playing through the whole game on my laptop with those occasional dips, since the VO kept playing unimpeded. It's bordering on visual novel territory-point being, while the graphics are there to add personality to a scene, the animation tends to be pretty simple and simply augment the dialogue. Outside of combat, Persona is a very dialogue heavy game. But even then the VO played just fine without slowdown. I only encountered one scene, with a large number of 3D characters on-screen at once, where the framerate dipped below 30 fps and was noticeably sluggish. Performance wasn't great, but mostly fluctuated between 30 and 40 fps, bouncing as high as 60 fps if there wasn't much going on on-screen.
I played a couple hours of Persona 4 on the laptop, running at 1920x1080 and 100% resolution scaling. The integrated HD Graphics 520 weren't exactly powerful in 2015, and are basically decrepit now. Unsurprisingly, the game runs well on both desktops, but it's also playable on my laptop, running nearly five year old hardware.
Laptop: i5-6200U, Intel HD Graphics 520, 8GB RAM.
I tested Persona 4 Golden on three PCs with a range of hardware:
I think even with serviceable mouse/keyboard controls, the game will still be most comfortably played with a controller. Q and E pan the camera, which works okay. Unfortunately it doesn't let you use the mouse to control the camera in-game (though you can click to recenter the camera behind you). Unlike some other PC ports of older console games, Persona 4 supports the mouse in menus, so it feels like a proper PC game, though with a bit of residual weirdness. It would be nice to see an in-game limiter with options like 30, 60, 144, etc., but still, it's wonderful to see a Japanese PC port of a decade-old game with an unlocked framerate. But that's because it's seemingly unlocked (a bit more detail on this in the performance section below). No fancy options here, and at first I was worried not to see framerate listed at all.
Keyboard (not pictured: Customizable keybinds for each input.
Audio language (not pictured): Choose between English and Japanese voices.
I did notice some screen tearing on a low-end system with it disabled, but if you have a variable refresh rate monitor, you likely won't need V-Sync. Thanks to rendering scale, not much reason to choose a resolution other than native.
Display: Resolution - Configurable in fullscreen or windowed.
Display: Screen mode - Windowed, Fullscreen, Borderless.
Graphics: Anti-aliasing - On or off only.Shadows have Low, Medium, High, while anisotropic filtering only has Low, High, and Off. Graphics: Anisotropic filtering and Shadow quality - Very basic options here.Graphics: Rendering scale - 25% increments all the way up to 200%, letting you run the game at lower than your display resolution, or supersample from a much higher res.
0 notes
Text
Game Companion: Death Stranding APK + Mod (Free purchase) for Android

💾 ►►► DOWNLOAD FILE 🔥🔥🔥 Please see for details how to get started and configure this photomode mod, General features and configuration. If you don't see the ds. I know, who would think of that! The Image Adjustments tab is the tab where you can adjust some aspects that might influence the image. To take screenshots at higher resolutions than your regular gaming resolution, run the game in windowed mode. To get rid of the window border, on the Hotsampling tab, click 'Fake fullscreen'. To switch to a high resolution, select the resolution and aspect ratio you want from the tree on the Hotsampling tab and click 'Set'. You can also select one from the list of previous used resolutions if you switch between a given set of resolutions frequently. If the resolution fits your monitor, the game will add a border, you have to click 'Set' again to get rid of it. The IGCS client will resize the game window to the requested resolution and the game will resize the game framebuffer accordingly, allowing you to take a shot at a high resolution. To go back to your regular gaming resolution, simply click the 'Fake fullscreen' button again. You have to click the set button twice. This is because the game tries with all its might to reduce your fun with it, so it wants to keep the window bar and clamps the window size to your monitor's size. If you click the Set button the second time, the window will be properly resized and the window bar will be removed. Also be aware that hotsampling is something the game doesn't officially supports so it might crash, especially if you cranked up the LOD slider. It also might be it looks like the game hangs when you unpause or that you have to press Numpad 0 multiple times. Additionally, you can unpause the game in the photomode, but it will require pressing Numpad 0 twice. The same problem happens after you've then leave the photomode and press Numpad 0 again, it says 'game paused' but the game isn't pausing. Pressing Numpad 0 again will pause the game. So rule of thumb: use frameskipping as less as possible. When possible, try to use the photomode F8 also in cutscenes to pause the game. You can then press Insert to enable the camera and move it to whereever you want. It's wise to enforce anisotropic filtering x16 at the Nvidia configuration panel, as by default the game uses x4. When you create a Camera path , each node records the camera location, orientation and field of view. The default photomode mod controls are listed below. It depends on the Camera control device setting on the Configuration tab whether the device e. Versions and compatibility Latest version Regular: v1. Director's Cut: v1. Game speed control slow-motion, speed up Frameskip HUD toggle Hotsampling resize the game window to any resolution Higher terrain LODs Configurable keybindings Configurable gamepad buttonbindings How to use Please see for details how to get started and configure this photomode mod, General features and configuration. Info If you don't see the ds.
1 note
·
View note
Text
Borderless Gaming

Simply add a game window to the application and from then on it will make sure your game will be borderless everytime you play automatically. Configure the settings globally or individually per game, to get the best experience. Borderless Gaming arrives in a thin bundle and highlights simply a solitary little window where gaming titles can be overseen. The application highlights two principle territories, one where alternate ways of game Exe documents can be added, and another where any additional title will naturally compel the windowed game to be run in borderless mode. To check a game's compatability with Borderless Windowed I'd recommend using PC Gaming Wiki. Usually it'll just be an option in-game, but for others you might have to run in Windowed then make it borderless with an app like Borderless Gaming. In TF2's case, it's adanced launch options. I run all my games in borderless as a chronic alt-tabber. Jul 26, 2015 If you want Borderless Gaming to make the game borderless when it is ran, click the right arrow on the UI and add the game to your favorites. If the game title changes every time its ran, right click and add it by its binary name (Terraria for example does this) Or just click the Make Borderless button with the game you want highlighted for a.

7,274 downloadsUpdated: July 8, 2019Donationware / GPLv2
Skip the time consuming Alt-Tabs and enjoy playing your favorite games in a continuous window without any borders thanks to this utility

Borderless Gaming is a tiny, but useful tool that enables you to play your favorite video games that are available in windowed mode only in fullscreen.
Borderless Gaming

It optimizes games to be streamed at any resolution
First off, it is worth mentioning that for the app to work, you need to make sure that the game or application you are running is in windowed mode. Moreover, in case the application you need to run in fullscreen does not have graphic settings and has no reasonable option in this sense, then you can consider posting about it in the Steam community forum to get some help.
The idea behind the tool is to lend you a hand with running the app in fullscreen and streaming at any desired resolution, regardless if the function exists or not. The highlight stems from the fact that it does so without you having to worry about alt-tabbing to look for a tutorial in the browser or change your music, for instance. Most importantly, it prevents crashes that commonly result from switching between various apps.
Designed to work smoothly with multiple monitors
Functionality-wise, the tool is as simple to use as it looks. Therefore, once you enable the windowed mode in-game or inside the app, you open the program and it takes care of the rest. The idea behind the app is to remove the load time for switching between games and apps in a safe manner that does not affect the functionality of what you are accessing in any way.
While it works great with one monitor, its real power is unleashed when you use multiple monitors. Not only does it detects all active windows running on your system, but you can switch back to windowed mode with just one click. In addition, some users stated that the tool also allows you to select the monitor the game is played on without you having to change the primary display.
A reliable app for launching apps in fullscreen without any side effects
All things considered, Borderless Gaming is a utility designed to help you make the most out of your fullscreen gaming mode, but without having to worry about crashes and other negative effects associated with Alt+Tab.
Filed under
Borderless Gaming was reviewed by Alexandra Sava
5.0/5
New in Borderless Gaming 9.5.5:
This release is identical to 9.5.4. The certificate used to sign the last release has expired and cannot be renewed; I have chosen to sign it using the EV cert from my company which should always be up-to-date.
I also owe the entire community an apology. If you wish to read it you can do so here. It covers a lot of details and how I plan to step away from Borderless-Gaming to make up for past actions.
Read the full changelog This enables Disqus, Inc. to process some of your data. Disqus privacy policy
Borderless Gaming 9.5.6
add to watchlistsend us an update
4 screenshots:
Borderless Gaming 8.4
runs on:
Windows 10 32/64 bit Windows 8 32/64 bit Windows 7 32/64 bit Windows Vista 32/64 bit Windows XP 32/64 bit
file size:
3.8 MB
filename:
BorderlessGaming9.5.6_admin_setup.exe
main category:
Gaming Related
developer:
visit homepage

top alternatives FREE
top alternatives PAID
How it works
Must have for streaming games that do not have the option build in. Stream fullscreen @1080p while still being able to easy Alt/Tab out as if you were in windowed mode. This way you can stream in top quallity while still communiccating with your viewers. Or play your game on your second monitor, thanks to our mouse locking options this application makes sure your cursor stays in your game window while you play.
Borderless Gaming 9

If you have a Steam account you can join our official Steam group, where we have a helpful community on the forum, and where you can also make you suggestion for new features and/or improvements.
Simply add a game window to the application and from then on it will make sure your game will be borderless everytime you play automatically.
Configure the settings globally or individually per game, to get the best experience.
Why use this program to play fake-fullscreen?
You will have a fullscreen experience with all the benefits of running the game in a window.
Allot of modern games run smoother when running in a window. No more need for V-sync.
No more downloading loads of diffrent apps to get diffrent games borderless, now you have one app to rule them all.
Simple to use, add any game within a few seconds only once and the program will remember it for the next time you play.
0 notes
Text
Samsung Galaxy S20+ Review
New Post has been published on https://magzoso.com/tech/samsung-galaxy-s20-review/
Samsung Galaxy S20+ Review

Samsung’s bouquet of premium Android smartphones this year looks promising. We have the S20 series for photography enthusiasts, and the Galaxy Z Flip for those looking for the bleeding edge of smartphone technology. We haven’t even counted the next Galaxy Note smartphone, which should come later in the year, and will no doubt have unique features to brag about too.
The big focus for the new Galaxy S20 series this year are the cameras. Samsung is making a lot of noise about its new ‘Space Zoom’ feature and the fact that the S20 models are the first to offer 8K video recording at a useful framerate. The phones looked quite impressive when we first saw them at Samsung’s Unpacked event last month, and now it’s time to take a closer and more in-depth look, starting with the Galaxy S20+.
This is the direct successor to the Galaxy S10+ and like with every iteration, we should expect a sleeker design, better battery life, improved camera performance, and of course, a more powerful processor.
Priced at Rs. 73,999 in India for the sole 128GB version, is the Galaxy S20+ worth it? Let’s have a look.
Samsung Galaxy S20+ design
The Galaxy S20+ is instantly recognisable as a Samsung smartphone. Compared to the Galaxy S10+, Samsung has refined the design. The upper and lower bezels of the display are narrower, and the glass back has a wider curve at the sides, covering more of the aluminium frame. This phone is still very comfortable to hold but the glossy finish does make it quite slippery. It’s not too thick at 7.8mm, but it’s slightly heavier than its predecessor at 186g.
The narrow display borders and slightly taller body have allowed Samsung to use a much larger display. The Galaxy S20+ features a 6.7-inch QHD+ Dynamic AMOLED 2X panel, with support for HDR 10+ and, for the first time, a 120Hz refresh rate. You can set the display to run at 60Hz at its full resolution, or 120Hz at or a lower, full-HD+ resolution (which is the default setting) if you like. However, you can’t have the 120Hz refresh rate at the full resolution, at least not yet. There have been rumours about Samsung planning on allowing this with a software update in the future.
The Samsung Galaxy S20+ has a gorgeous display with a 120Hz refresh rate
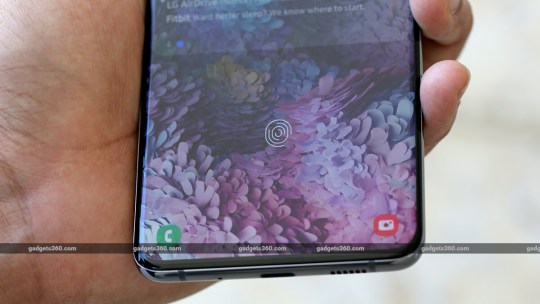
The Galaxy S20+ loses the secondary selfie camera that the Galaxy S10+ had, and instead there’s a single, centre-mounted hole-punch cutout. It’s not obtrusive in any way, and apps generally block out that area, so the cutout doesn’t interfere with menus or other UI elements from fullscreen apps. The volume and power buttons are on the right, and Samsung has done away with the dedicated Bixby button. Instead, you can customise the long-press function of the power button to either wake Bixby or launch the power menu. A double-press action can also be set to launch the camera, open Bixby, or any other app.
The SIM tray is on the top of the phone and can either house two Nano-SIMs or a single SIM and a microSD card. At the bottom of the phone, Samsung has gotten rid of the headphone socket for its flagships since the Galaxy Note 10, and so here, we just have the microphone, USB Type-C port, and a speaker. There is an earpiece just above the camera hole, cleverly camouflaged between the outer frame and display, making it virtually impossible to see.
We have the Cosmic Gray colour variant of the Galaxy S20+, but it’s also available in Could Blue and Cosmic Black trims in India. There is a rectangular camera bump on the rear, which houses four camera sensors, a microphone, and the LED flash.
The design of the camera cluster reminds us a lot of some of the recent Galaxy A-series offerings we’ve seen, which we feel dilutes the Galaxy S20 series’ street presence a little. We would have liked a more distinctive design for the rear of this phone, much like what Apple did with the iPhone 11 (Review) series, just to give its flagships better flaunt value.
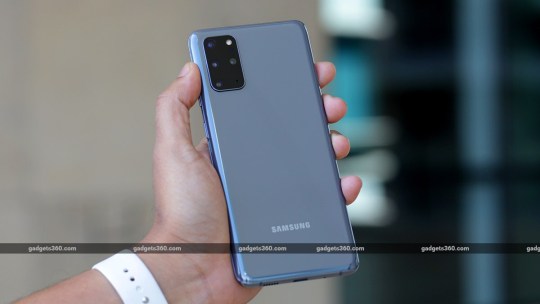
The back of the Samsung Galaxy S20+ looks a bit bland in our opinion
Having said that, the Galaxy S20+ feels a lot more premium than any of Samsung’s mid-range phones, once you actually hold it. It’s extremely well built, has a higher screen-to-body ratio, and is still fairly light. In the box, you can expect to find a 25W fast charger, a Type-C to Type-C charging cable, an AKG-branded headset, a silicone case, and the usual leaflets. The Galaxy S20+ ships with a screen guard which for once is well applied and not intrusive when performing gestures.
Samsung Galaxy S20+ specifications and software
Globally, Samsung is marketing the S20 series as 5G smartphones, however in India, the entire S20 series will only support 4G. The 5G version of the Galaxy S20+ comes in multiple storage variants but the LTE-only version, which we have, is sold in just one configuration with 8GB of RAM and 128GB of storage. The latter is expandable, which is something we don’t see too often these days on flagship phones. Samsung has also used LPDDR5 memory here, which promises higher data rates and lower power consumption.
Like all previous Galaxy S flagships sold in India, the Galaxy S20+ is powered by an Exynos chip rather than a Qualcomm Snapdragon chip, and the one used here is the Exynos 990. You can read more about it here, but essentially it’s a 7nm octa-core SoC with two custom Samsung cores for heavy-duty tasks, two Cortex-A76 cores and four Cortex-A55 cores for lighter workloads. Graphics is handled by the Mali-G77 GPU, which claims to offer a 20 percent boost in performance over the previous generation. Overall, we should expect performance along the lines of Qualcomm’s Snapdragon 865 SoC.
The in-display ultrasonic fingerprint sensor in the Samsung Galaxy S20+ is quick and never fails
You also get all the other flagship connectivity features you would expect such as Wi-Fi 6, Bluetooth 5, stereo speakers tuned by AKG, Hi-Res audio support for wired headphones, IP68 dust and water resistance, fast wireless charging, NFC, and MST support for Samsung Pay.
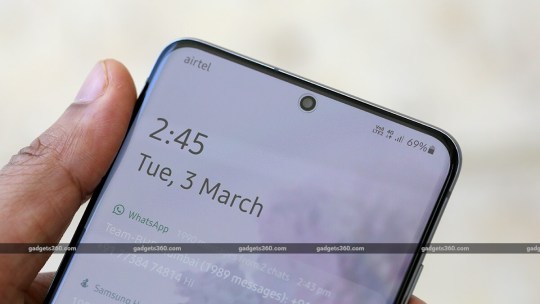
The Galaxy S20+ runs One UI 2.1 which is based on Android 10, and our unit originally shipped with the February security patch. However, we received a software update, during our review with the March security patch. The latest version of Samsung’s Android skin feels extremely refined, and even though there are a tonne of features to explore, it doesn’t feel cluttered or overwhelming.
Features such as Samsung Dex and Link to Windows are present, and you also get the usual Samsung staples such as a built-in screen recorder, a screenshot editor, Edge screen, and a highly customisable always-on-display. Augmented reality (AR) features are all grouped together in an app called AR Zone, so you don’t have to launch the camera app just to use features such as AR Doodle.
One UI will show you promotional messages as notifications but this can be fixed by simply disabling a few toggles in the Privacy menu of the Settings app.
Samsung Galaxy S20+ performance and battery life
The Galaxy S20+ delivered rock-solid performance in the time we used it, and we expected nothing less. One UI has really grown on us, and today it’s easily one of our favourite Android skins. The 120Hz display makes scrolling through menus feel snappy and gives the overall usage experience a more fluid feel. However, we preferred using the Galaxy S20+ at the QHD+ resolution just for that extra bit of sharpness in the UI, but that’s just us. It’s a little surprising that 120Hz is not enabled by default (which should have been the case), as we suspect many users might not discover that this option even exists.
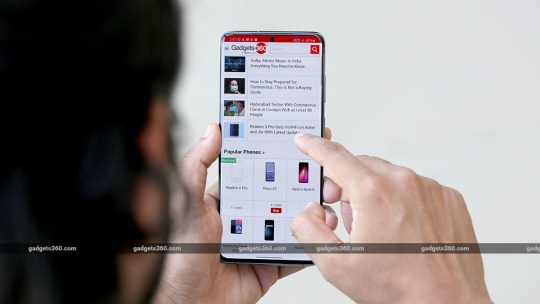
The Samsung Galaxy S20+ offers very good app and gaming performance
The Exynos 990 is a solid performer, and the benchmarks solidify our experience. In AnTuTu, we got a score of 5,17,291 points, while the 3DMark Slingshot Extreme graphics test returned 6,721 points. These numbers were slightly lower than the scores we got from the Realme X50 Pro 5G (5,69,618 in AnTuTu and 7,202 in 3DMark). In any case, you’d be hard-pressed to notice any difference in real-world performance and even games. The usual heavy-hitters such as PUBG Mobile, Asphalt 9: Legends, and Warhammer 40,000: Freeblade ran absolutely smoothly at the highest settings. The Galaxy S20+ got quite hot after about 20 minutes of gaming, but it was nothing we couldn’t handle.
The display is easily one of the best we’ve come across. Colours are rich with very good saturation, and brightness is more than adequate. The ambient light sensor can be a little sluggish at times, when it comes to adjusting brightness to match ambient light, but this isn’t a big complaint. HDR content looks very good, and thanks to the slimmer bezels, watching videos felt very immersive.
Audio quality from the stereo speakers was quite impressive too. The earpiece and the bottom-firing speaker sounded well balanced, and with Dolby Atmos enabled, the spatial separation was audibly better. Bass is still a little weak but there’s enough warmth in the sound to prevent it from seeming tinny. The bundled AKG provides equally good audio as well as passive isolation from ambient noise.
We should touch upon the phone’s biometric authentication systems. There’s the ultrasonic in-display fingerprint sensor, which is fast and didn’t fail us during the review period. Face recognition is also an option, and it works well but isn’t as fast as we would have liked. It also tends to struggle in very low light, in which case, we had to resort to our fingerprint for authentication.
The hole-punch cutout is small and not too intrusive
All of this does take a toll on battery life, which is why Samsung has bumped up the capacity to 4,500mAh for the Galaxy S20+. It’s safe to say that battery life is pretty solid, but not exceptional. We were able to get a 24-hour runtime on most days, when our usage wasn’t very heavy. However, on days when we used the camera a lot or played games for a long time, we did have to charge the phone a little sooner.
Thankfully, it doesn’t take long to charge the Galaxy S20+. With the bundled 25W adapter, we managed to charge the battery up to 55 percent in half an hour and up to 93 percent in an hour. It also supports Fast Wireless Charging 2.0, if you have a compatible 10W or higher wireless charger. Like before, the Galaxy S20+ also supports Wireless PowerShare or reverse wireless charging, which can be used to charge accessories such as the Galaxy Buds+.
Samsung Galaxy S20+ cameras
The Samsung Galaxy S20+ has a brand new camera setup with two of the highlight features being 8K video recording and up to 30x hybrid zoom. The primary sensor still has a 12-megapixel resolution with Dual Pixel autofocus, an f/1.8 aperture, and OIS, but the pixel size is now 1.8 microns compared to 1.4 microns on the previous model.
The ultra wide-angle camera also uses a 12-megapixel sensor, but with smaller 1.4 micron pixels, a narrower f/2.2 aperture, and no autofocus. The telephoto camera gets the biggest change, with a 64-megapixel sensor but no optical stabilisation. The ‘Plus’ model that we have has a depth vision camera which is absent in the standard Galaxy S20. Another change, which you’ve probably noticed, is that Samsung has ditched its variable aperture system with the Galaxy S20 series, for better or worse.
The camera interface feels familiar if you’ve used any recent Samsung phone. We have a customisable row of shooting modes just above the shutter button, while the rest of the settings such as the aspect ratio, timer and toggle for ‘Motion photo’ sit on the far side of the viewfinder. The app offers toggles to enable the Scene Optimiser, which detects objects or a scene in the frame. Shot Suggestion will offer tips to better your framing, and there are experimental features such as HDR 10+ video, which can be enabled.
Initial reviews of the Galaxy S20 Ultra highlighted some big issues with the autofocus system, which Samsung has promised to fix. While we didn’t face any such issues with the Galaxy S20+ while we were testing it, we received a software update which promised improvements for the cameras. We re-tested the cameras and didn’t find anything new or different about the usage experience, but we did note that low light selfies seemed to have gotten better.
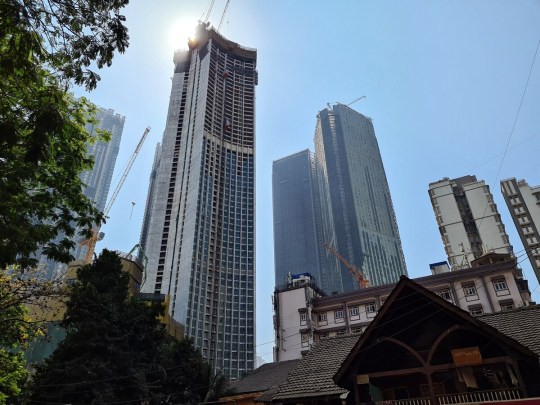
Landscape shot taken with the Samsung Galaxy S20+ (tap for full-sized image)

Wide-angle shot taken with the Samsung Galaxy S20+ (tap for full-sized image)
Close-up shot taken with the Samsung Galaxy S20+ (tap for full-sized image)
When shooting with the main camera under good light, the Galaxy S20+ captured very good details with pleasing colours and no visible noise in the shadow areas. HDR is handled very well, even when shooting subjects directly against the light. With the wide-angle camera, there’s a lot more of any scene to capture, but you do get some barrel distortion. Close-up shots also turned out great, with excellent detail, sharpness and good natural bokeh.
The really fun part is the phone’s new zoom system. The telephoto camera offers 2x optical zoom, and beyond that, it uses a mix of AI-assisted hybrid zoom and digital zoom. You can directly jump to certain zoom levels with dedicated buttons that appear once you tap the telephoto icon in the viewfinder. You can manually zoom in to a precise point as well, using the traditional pinch gesture.
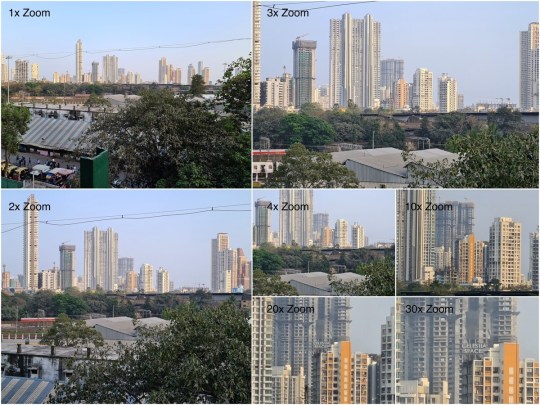
Zoom samples of the Samsung Galaxy S20+ (tap for larger image)
Photos taken with the telephoto camera were good, given ample light. During our initial testing, we found image quality inconsistent, but following the software update, things seem to have gotten better. After the 10x zoom level, textures on objects look visibly smoothened as grain and noise are removed. At the full 30x zoom, the Galaxy S20+ is able to resolve a decent amount of detail. Compared to cropping a native 64-megapixel sample, the same image with a 30x zoom offers better clarity. Beyond 20x, you get a little preview window in the upper left corner of the viewfinder to help you frame your shot.

Low light zoom sample taken with the Samsung Galaxy S20+ (tap for larger image)
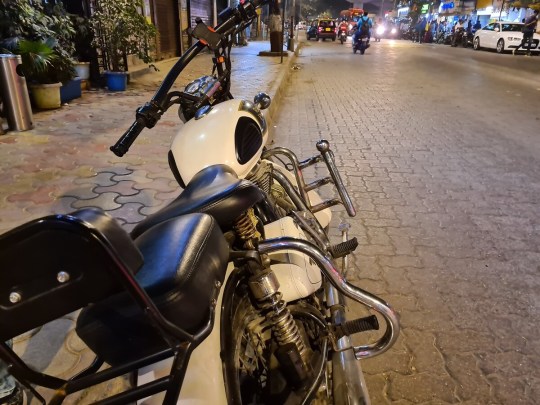
Low light close-up taken with the Samsung Galaxy S20+ (tap for full-sized image)
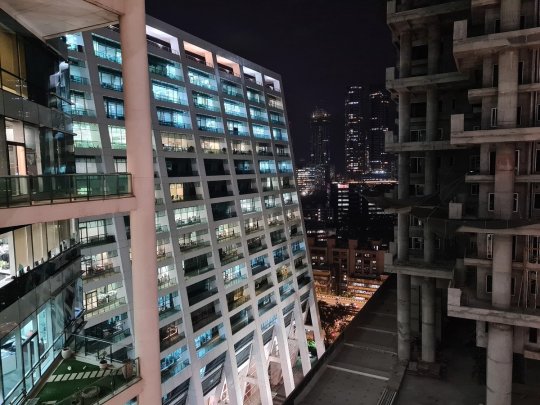
Low light shot taken with the Samsung Galaxy S20+ (tap for full-sized image)
In low light, using high levels of zoom doesn’t yield very favourable results. However, using Night mode with 10x zoom can offer vastly better results than a standard shot with the same zoom level. Speaking of Night mode, this works across all three main sensors and helps get rid of grain and improves exposures. Low-light performance in general is very good too. We managed to get some good details and colours with the primary camera, and noise was handled well too.

Portrait sample taken with the Samsung Galaxy S20+ (tap for full-sized image)
Live Focus mode works well, and we had a good success rate with people, but objects were a bit of a hit or miss. The background depth effect can be adjusted before or after you take a shot, and you can even apply different bokeh effects. Edge detection was also handled well.
A new shooting mode in the Galaxy S20+ is called Single Take. With this, the camera captures a 10-second video along with stills at various intervals, and based on what’s being shot, it will automatically apply filters to some of the shots. This is most effective when you’re capturing an activity, rather than a still scene.
The Galaxy S20+ is a very capable smartphone for video too. The highlight of course is 8K video, which works well, but you’ll need an 8K display or TV to really take advantage of such footage. It’s great that we have a phone that can record at this resolution, but since the frame rate is limited to 24fps, we found it better to simply stick with 4K video. Image quality is very good in daylight, with excellent stabilisation and details. In low light, the stabilisation causes a bit of a wobble effect in video, but other than this, the quality is good.
You can switch between all the cameras, including the selfie camera, when shooting up at to 4K resolution at 30fps. Video quality understandably isn’t very good when shooting with the wide-angle or telephoto cameras in low light. There’s the Super Steady video mode too, which is supposed to offer gimbal-level smoothness. While it does work to an extent, we preferred the quality when using the primary camera for a couple of reasons. In Super Steady mode, only the wide-angle or telephoto cameras (depending on the perspective you select) are used, and the resolution is restricted to 1080p.
Other shooting modes include Live Focus for videos, and there’s even a manual video mode now, just like you have for stills. Super slow-motion mode is present too, but at 960fps, you’re still limited to a 720p resolution.

Selfie taken with the Samsung Galaxy S20+ (tap for full-sized image)
Coming to the selfie camera, we have a 10-megapixel sensor with Dual Pixel AF and an f/2.2 aperture. During the day, the beautification filter that’s on by default smoothens skin textures quite heavily, making photos look unnatural. Switching it off improves results considerably. Live Focus is also a bit of a hit or miss, with incorrect edge detection. Before the software update, we had terrible results with the selfie camera in low light, but things have improved a bit post the update.
Verdict
The Galaxy S20+ might seem very expensive, but Samsung has actually priced it the same as the Galaxy S10+, when it launched a year ago. From that perspective, the Galaxy S20+ offers improved design and performance across the board, which makes it a worthy upgrade. Some of its stand-out features include the new zoom system for the rear cameras, the excellent display, solid battery life, and a sleeker design. Other things such as reverse wireless charging, the stereo speakers, and the lean software make this a very good package to consider.
However this phone does have its share of weakness, such as the fact that it gets quite warm when playing heavy games for extended periods of time, and face recognition doesn’t work very well in low light. The design of the back is also a bit bland for a flagship phone in 2020. Battery life, while good, could have been better, and fast charging isn’t as quick as some of the solutions we’ve seen from other manufacturers.
Another sore point for some buyers might be the lack of 5G support in the Indian models. While it’s not a big loss if you’re only going to be using your phone in India, it could be a deal-breaker for people who travel a lot or who intend to hold on to their expensive purchases for several years. Both Realme and iQoo have launched 5G devices in India for a lot less, making the Indian Galaxy S20+ seem less future-proof.
Overall, the Galaxy S20+ is still a great flagship that offers excellent all-round performance, top-of-the-line features, and of course, brand value.
0 notes
Text
DOWNLOAD Monolab - Creative Portfolio Theme


A streamlined portfolio solution for every agency, designer, freelance professional & more, Monolab is the perfect instrument for creating the website your work deserves.

Showcase your body of work in a captivating way & reach out to your audience with a whole new twist. We’ve equipped Monolab with absolutely everything needed to provide you with a smooth website building experience. You get a whole new way to present your creative portfolio including the view switch feature, alongside an exquisite selection of shop and blog templates for presenting your products and sharing your latest updates with the crowd.


What makes Monolab unique are its special features which will help add a one-of-a-kind spin to your portfolio’s viewing experience. You can let visitors switch between list and project views on the fly, enable navigating through single project pages as well as letting your audience filter the projects in the list itself, all while never leaving the portfolio list page.

Here’s a link if you’d like to check out the Monolab Documentation Theme Features Easy to use – no coding knowledge required Powerful Admin Panel Large collection of home and inner pages Import demo site with One-Click Responsive and Retina Ready WPBakery Page Builder for Wordpress included ($46 value) Slider Revolution Responsive WordPress Plugin ($26 value) WooCommerce compatible YITH WooCommerce Quick View plugin compatibility YITH WooCommerce Wishlist plugin compatibility Extensive typography options Easy Color change Portfolio List shortcode Portfolio Category List shortcode Portfolio Project Info shortcode Portfolio Slider shortcode Portfolio Interactive Featured shortcode Portfolio Attached Info shortcode Portfolio Fullscreen Slider shortcode Portfolio List Gallery layout Portfolio List Masonry layout Portfolio List “Load More” Pagination Portfolio List “Infinite Scroll” Pagination Portfolio List Standard Pagination Portfolio List Change View Option Portfolio List Single Portfolio Preview Various portfolio single layouts Portfolio Single Image Left layout Portfolio Single Image Top layouts Portfolio Single Image Top Down layouts Portfolio Full Width Images layout Portfolio Single Custom layouts Enable Lightbox for portfolio images and videos Instagram Feed widget Twitter Feed widget Blog List widget Social Icon widget WooCommerce Dropdown Cart widget Product List shortcode Product List Simple shortcode Product List Carousel shortcode Product Info shortcode Product Masonry Carousel shortcode Video Button shortcode Section Title shortcode Pricing Table shortcode Call to Action shortcode Animation Holder shortcode Custom Font shortcode Detailed Info shortcode Various infographic elements One Page site – anchor functionality Multiple Blog List layouts Blog Standard layout Custom Post Formats: Audio, Video, Standard, Gallery, Link, Quote Social Share functionality Integrated search “Back to Top” button Enable passepartout border around website 5 Header Types Standard Extended Header Type Standard Expanding Header Type Centered Header Type Minimal Header Type Standard Header Type Three Header behavior types Sticky header behavior Fixed header behavior Separate mobile header styling options Multiple logo versions (for mobile header and sticky header) Dark and Light Logo variants Image or SVG Source Options for Logo Multiple Widget Areas in Header Multiple footer widget areas Customizable Footer with optional 1-4 Columns Footer top and footer bottom Customizable Google Map shortcode Choose your grid size Boxed layout option Video backgrounds Translation Ready Customizable Mega Menu Smooth Scroll Smooth Page Transitions Font Awesome Icon Font Pack Font Elegant Icon Font Pack Linea Icon Icon Font Pack Ion Icons Icon Font Pack Dripcons Icon Font Pack Simple Line Icons Icon Font Pack Linear Icon Font Pack 800+ Google Fonts Custom Widget Areas WooCommerce compatibility Set multiple contact form styles Child Theme included Change Log Version 1.2 – April 18th, 2019 - Added WooCommerce 3.6.1 compatibility - Updated Monolab Core to 1.2 - Improved import functionality - Improved theme security Version 1.1.1 – March 26th, 2019 - Updated Monolab Core to 1.1.1 - Improved framework files Version 1.1 – March 5th, 2019 - Added WooCommerce 3.5.5 compatibility - Added compatibility with Gutenberg plugin - Updated WPBakery Page Builder to 5.7 - Updated Revolution Slider to 5.4.8.3 - Updated Monolab Core to 1.1 - Improved framework files
Read the full article
0 notes
Text
PITCH V3.0.0 - A THEME FOR FREELANCERS AND AGENCIES


Let your creativity flow with a theme tailerod to perfectly fit the needs of any freelancer, agency, designer or creative agency of any kind. Pitch comes with 12 beautiful homepages, 4 case study layouts, 30+ portfolio templates. Packed with a wide array of features and a vast set of shortcodes ideal for any web design agency, digital agency or creative business in general. Present your works in stracking manner and create a personal portfolio, or designer portfolio with complete ease. Get Pitch today and share your talents with the world. Theme Features Powerful Admin Interface Highly Customizable No coding knowledge required One-Click Demo Content Import Select Core Plugin with custom post types Full Screen Select Slider with parallax functionality Image/video slides in Select Slider Unlimited custom animations in Select Slider SVG Graphics Functionality and SVG Line Drawing Animation in Select Slider Image movement animation in Select Slider Unlimited Header Layouts Menu Entry Animation Custom Font Animations Login Page functionality Unlimited Title Area Layouts Custom Animations on Title Area content Customizable Mega Menu Left and Right Side Menu Area – with optional background image and color from page to page Fullscreen Menu Sticky Content Menu – menu created from selected sections on page Anchor functionality in menu – easily navigate to any section on the same or different page Side Area Merging Image Shortcode Numbered Image Shortcode Pricing Info Shortcode Unlimited custom animations on elements in sections Video Background Sections Parallax Sections with full height option Border animations on elements Fixed Header (logo on the left and menu on the right) Fixed Minimal Header (logo centered, full screen menu icon to the left, search icon to the right) Fixed Advanced Header (logo centered above centered menu, with widgets on both sides of the logo featuring hidden menu on scroll displayed on mouse over) Fixed Header Top (logo centered in the header bottom, menu in the header top with search and side area icons) Sticky Header (logo on the left and menu on the right) Sticky Expanded Header (logo and menu on the left, menu below logo) Sticky Divided Header (logo centered with menu on both sides of the logo) Sticky Compound Header (logo to the left, menu to the right, with widget area above menu) Header with Logo and Menu centered Separate Normal, Sticky, Fixed Advanced, and Mobile Header Logo Versions Separate Logo version for Side Menu Area Bottom Separate Content Menu Logo version Separate Logo versions for dark and light header skin Optional Header Top widgets area Expandable Search Field – Optional functionality in header right widget area Multiple Search Bar types Customizable Footer – choose from 1 to 4 column layout, with regular or unfold functionality Improved Passepartout Functionality Instagram feed widget Twitter feed widget Icon hover animations Customizable Shop pages Variable grid size Multiple Portfolio List and Portfolio Single Layouts New Portfolio Single types Related Projects functionality on Portfolio Single Pages Portfolio Masonry (regular and Pinterest style) Layout Portfolio List Item entry animation Multiple Blog List and Blog Single Layouts Blog Masonry Layout Blog Info on Side Layout Blog Slider Custom Post Formats: Standard, Gallery, Link, Quote, Video, Audio Full Screen Sections Optionally disable Full Screen Sections on mobile Vertical Split Slider Split Slider With Text Text Slider Carousel Slider AJAX Page Transitions – choose between 4 different animations, can be controlled globally or on page level WPBakery Page Builder for WordPress included ($46 value) LayerSlider Responsive WordPress Slider Plugin included ($25 value) WooCommerce Integration Contact Form 7 Integration 80+ Custom Shortcodes Interactive Infographics Smooth Scroll Retina Ready Multiple Custom Sidebars 600+ Google Fonts Font Awesome, Font Elegant, Ion Icons, Simple Line Icons, Linea Icons, and Dripicons Icon Packs Maintenance Mode Functionality WPML Plugin Integration Translation (po&mo files) Ready SEO Optimized Child Theme Ready Read the full article
0 notes
Video
vimeo
RIO - 8K from SCIENTIFANTASTIC on Vimeo.
BEST VIEWED IN HD, FULLSCREEN, SCALING OFF
Follow me at: Twitter - twitter.com/scientifantasti | Instagram - instagram.com/scientifantastic | Google+ - gplus.to/scientifantastic
I was lucky enough to be sent to Rio on assignment to shoot some Ultra HD 4K and 8K timelapse footage for a major electronics manufacturer. This video is a compilation of some of the footage I shot there. Most of the locations are within the city of Rio De Janeiro, but I also traveled to the famous Iguazú Falls on the border of the Brazilian state of Paraná and the Argentinian province of Misiones. In 2011 Iguazú Falls was announced as one of the seven winners of the New Seven Wonders of Nature by the New Seven Wonders of the World Foundation.
RIO DE JANEIRO No wonder the beautiful city of Rio De Janeiro was chosen to host the 2014 FIFA World Cup and the 2016 Summer Olympics. Rio de Janeiro, or simply Rio, is the capital city of the State of Rio de Janeiro, the second largest city of Brazil, and the third largest metropolitan area and agglomeration in South America, boasting approximately 6.3 million people within the city proper. Part of the city has been designated as a World Heritage Site, named "Rio de Janeiro: Carioca Landscapes between the Mountain and the Sea", identified by UNESCO in the category Cultural Landscape.
Rio de Janeiro is one of the most visited cities in the southern hemisphere and is known for its natural settings, carnival celebrations, samba, Bossa Nova, balneario beaches such as Barra da Tijuca, Copacabana, Ipanema, and Leblon. Some of the most famous landmarks in addition to the beaches include the giant statue of Christ the Redeemer ("Cristo Redentor") atop Corcovado mountain, named one of the New Seven Wonders of the World; Sugarloaf mountain (Pão de Açúcar) with its cable car; the Sambódromo, a permanent grandstand-lined parade avenue which is used during Carnival; and Maracanã Stadium, one of the world's largest football stadiums.
I hope you enjoy the video!
Camera Gear: Canon 5DIII Canon 5DII PhaseOne IQ180 Various Canon lenses
Music By: Jan Baumann - baumann-musik.de open.spotify.com/track/6XNJkJOhW7EQYTfi2EmudH?si=qS8kgXb0T2u7_B8yy0tUsA
Special thanks to: My production assistant José Olímpio ( joseolimpio.com ). Without his help this video would not have been possible. If you are ever in Rio and need a local production person I highly recommend José.
Dynamic Perception - dynamicperception.com Division Camera - divisioncamera.com Digital Fusion - digitalfusion.net Jag35 - jag35.com
YOU CAN FOLLOW ME AT: Twitter - twitter.com/scientifantasti Instagram - instagram.com/scientifantastic Vimeo - vimeo.com/scientifantastic Facebook - facebook.com/pages/Scientifantastic/163137190447579 Google+ - gplus.to/scientifantastic 500px - 500px.com/scientifantastic ProPic - propic.com/scientifantastic
0 notes
Text
How to Boost Your Older Graphics Card’s Performance
The ongoing coronavirus pandemic has upended economic activity around the globe and made it rather difficult to plan a PC upgrade. With tens of millions of people recently out of work and everyone stuck at home, boosting the performance of the hardware you’ve got on hand suddenly became a lot more interesting.
Before we kick-off, a few caveats are in order. First, the tweaks we’ll explore, even taken in aggregate, will certainly help but are unlikely to work miracles. Performance tuning can improve frame rates and turn a game that’s chugging in places into one that runs noticeably and meaningfully better, but there’s no way to turn an HD 7970 or GeForce GTX 680 into a Radeon 5700 XT or RTX 2080. Second, because every game is different, some of these tips may be more or less effective depending on the title.
Two miscellaneous tips before we start: First, always make certain you are playing games in fullscreen mode, not windowed, and not borderless (windowed mode, without a visible border). Windowed mode is slower than fullscreen, in virtually every title, because your GPU is drawing both your desktop and the game itself at the same time. Windows 10 has cut the gap dramatically, and not every game offers a fullscreen mode, but you should always test the option if it’s available.
Second, make sure you’ve dusted both your GPU and CPU. While unlikely to be a major slowdown cause, it’s far from impossible for a GPU’s performance to drop because the card is throttling under load. Dust is an excellent insulator and if you’ve got an older card, you’ve got no performance to spare in the first place.
Game-Specific Optimization
The first thing we recommend doing to squeeze a little performance out of an aging card is to experiment with game settings themselves. While most reviewers and gamers test titles according to presets (Low, Medium, High, etc), this is a practical time-saving necessity for the former and a matter of convenience for the latter.
Gamers generally know that certain features explicitly tied to AMD or NV GPUs (think GameWorks) can incur heavy performance penalties on other architectures, but the same can be true for other features as well. It’s not unusual for a game’s implementation of ambient occlusion, tessellation, or antialiasing to hit one company’s GPU harder than another, and this can even vary depending on GPU family. Yes, simply lowering game settings or resolution can improve frame rate, but toggling specific features can get you nearly the same results for a smaller reduction in performance. In Deus Ex: Mankind Divided, turning on MSAA has a phenomenal performance impact, for example — much more than you’d typically expect.
The slideshow below shows the impact of different detail levels in the 2014 Shadow of Mordor, with the optional HD texture pack installed. You can see differences here, but they’re subtle. Medium detail definitely doesn’t pack as much eye candy as Ultra, but it still presents an attractive-looking and engaging game. Even turning off features like ambient occlusion or disabling tessellation doesn’t hurt the visual appeal much. Different games have different “break” points, some look dramatically different at Medium compared to High, while others “break” at Medium versus Low. Oftentimes the benefits of “Very High” or “Ultra” are quite small compared with their performance hit.
Don’t be afraid to climb into the Advanced Options and start changing various sliders. Because different GPUs take different performance hits from different options, you may need to do a little detective work, but it’s not unusual to boost frame rates by 5-10 percent just from small tweaks.
If you need a tool for checking performance in DX11 and earlier titles, FRAPS is still a good choice. (DX12 performance monitoring is more complicated and a bit beyond the scope of this article). It’s also a good idea to use presets as rough targets. If you know a game runs acceptably fast on “Low” and too slowly on “Medium,” don’t be afraid to use “Low” as a starting point for tweaking features upwards. You may find there’s more eye candy available to you than you initially thought. Treat the situation like a buffet dinner — if you don’t see much difference between “Medium” and “High” textures in a title, check to see if dropping to Medium gives you enough headroom to turn up a setting you do care about. You may find that expensive features add relatively little to the game, giving you space to enable other visual improvements you want.
Running at a lower resolution is also a useful way to spot-check performance improvements, though this is title-specific. First-person shooters tend to scale better with resolution changes than a game like Civilization VI.
Driver Tweaks
Once upon a time (the late 1990s), it wasn’t uncommon for AMD and Nvidia to drop drivers that would improve game performance by 10-20 percent, even in older titles. Those days are mostly gone, provided you aren’t installing a launch-day update for a new game. But there are still a few ways you can tweak driver panel settings to squeeze out a little more performance.
On Nvidia cards (AMD has an analogous option in its own driver settings), you can set texture filter quality to “High Performance” as opposed to the default “Quality” option, force Ambient Occlusion on or off (if applicable), and force anisotropic texture filtering off.
Tweaking image quality in-driver won’t gain you a ton of performance, but it should improve things by a few percent. It’s also useful to check, to make sure you haven’t used global settings for one title and then forgotten to change them for another.
Check for Online Tweaks and Unofficial Patches
This one, again, is highly game-dependent. Some games don’t support modding or have small user communities. But in some cases, end-users take it on themselves to create patches that fix various aspects of a title, including issues that impact performance. Games like Skyrim and Fallout 4 have often received unofficial patches that can boost performance or optimize game textures for systems with low RAM.
Overclock Your GPU (Desktop Only)
We’re only touching on the topic here, not diving into it, but overclocking your GPU is typically good for a few percentage points of performance at the very least. Again, your results are going to vary based on which card you have and how aggressively the manufacturer tuned it beforehand. Tools like MSI Afterburner can be used to overclock most GPUs.
What might you get as a result? 5-10 percent would be a reasonable expectation depending on the card.
Note: Everything written here applies to desktop GPUs. ExtremeTech does not recommend attempting to overclock a laptop GPU.
If you are planning to test a GPU overclock, we recommend small tweaks (no more than a 5 percent increase to memory or GPU clock at any one time) and slow going. Stay away from adjusting your GPU’s voltage until you’ve researched the topic and the acceptable range of your card, and don’t tell Afterburner to automatically apply settings at boot until you’ve confirmed the settings you actually want.
Expect this process to lead to a lot of reboots and/or lockups if your goal is to squeeze every last drop of performance out of your card — you’ll have to do some testing to find out where the right breakpoints actually are, and it’s entirely possible to have ten games that run rock-solid on a GPU at one clock, but an 11th title that won’t run at anything but stock speeds. Such is the nature of this metaphorical beast.
If you aren’t overclocking by pushing voltages higher, the chances of damaging the card are fairly small, though we recommend you make sure the fans are dusted before you start pushing things. Most GPUs can typically handle a 5-10 percent overclock without complaint.
Adding It All Up
None of these solutions are going to work if you’re trying to coax more life out of a 10-year-old card, but they can measurably improve your overall performance. If you can tweak game settings for a 7 percent boost, pick up a 7 percent overclock, and tweak driver settings for a further 3 percent, you’ve got a 17 percent overall performance improvement. In a game struggling to hit 30fps (let’s call it 28fps for fun), a 1.17x improvement gets you up to 33fps. That’s not a ton, no — but the corresponding impact of each additional FPS is larger the lower your frame rate is. The perceived difference between 28 and 33fps is much larger than the gap between 60 and 65fps, even though both are 5fps faster than the other.
And of course, these are conservative estimates. In certain titles and particularly if unofficial performance-enhancing patches are available, you might see significantly larger gains, especially if you’re already bumping up against the VRAM limit of your current GPU. Resolution cuts can help a lot in this case — don’t be afraid to drop to lower resolutions if you’re seeing heavy stuttering, especially if you have an older or lower-end card with a limited amount of memory. It’s sometimes possible to write unofficial config files that make a game playable by lowering detail levels below what the developer intended. I had several WoW-playing friends whose graphics I “detuned” in this fashion, allowing them to raid on laptops that otherwise couldn’t handle the job. This was years ago, so I don’t know if the same hooks are still in the game, but there can be real value in this kind of optimization.
ExtremeTech is revisiting some classic posts and guides, each of which has been updated to reflect present-day conditions.
Now Read:
How to Download the Nvidia Control Panel Without the Microsoft Store
How an Article on Game Difficulty Explained My Own Modding, 18 Years Later
Sony Scaling Back PlayStation 5 Production Over Price, Not Coronavirus
from ExtremeTechExtremeTech https://www.extremetech.com/gaming/262688-boost-older-gpu-performance-since-cant-buy-new-one from Blogger http://componentplanet.blogspot.com/2020/04/how-to-boost-your-older-graphics-cards.html
0 notes
Text
These days, you don’t have to pay large to experience a smart smartphone. Even if you’re penny-pinching, the budget contenders could prove an appealing worth. One brand that has made great strides with its “a whole lot for little” approach is Realme. Today, the brand has value offerings across the entire affordable and mid-range spectrum. There’s the Realme X2 Pro at the vanguard, the Realme C3 lies at the other extreme.
I’ve used the Realme C3 up and close for quite some time. And all the while, my quest was to see whether it cuts as a good enough daily driver. So, let’s see how it went about.
But before that, here’s a quick comparison of the key specs differences between the Realme C3 and its precursor.
Realme C3 vs C2 Price and Specification
Model Realme C3 Realme C2 Display 6.52-inch HD+ LCD minidrop fullscreen 20:9 aspect ratio 6.1-inch HD+ LCD minidrop fullscreen 19:5:9 aspect ratio Processor 2.0GHz, MediaTek Helio G70, 12nm chipset 2.0GHz, MediaTek Helio P22 12nm chipset RAM 3GB/ 4GB LPDDR4X 2GB/3GB Internal Storage 32GB/64GB eMMC 5.1 (microSD up to 256GB) 16GB/32GB eMMC 5.1 (microSD up to 256GB) Software Android 10 Realme UI Android 9 Color OS 6.0 Primary Camera 12MP (f/1.8, 1.25μm) (Macro 8cm) + 2MP (f/2.4) portrait, PDAF, 1080p@30fps, 480p slow-mo 13MP (f/2.2, 1.12µm)+ 2MP (f/2.4), 1080p@30fps Front Camera 5MP 5MP Battery 5000mAh (OTG reverse charge) 4000mAh Price
3GB+ 32GB: Rs. 6,999
4GB+ 64GB: Rs. 7,999
2GB+ 16GB: Rs. 5,999
3GB+ 32GB: Rs. 7,999
Also, here’s everything you get within the box.
Realme C3 In-box Contents
1x 5V2A Adapter
1x Micro USB Cable
1x Important Info Booklet with Warranty Card
1x Quick Guide
1x SIM Card Tool
1x Screen Protect Film
Realme C3 Review: Design, Build, and Display
Realme C3 sports the new Sunrise Design, which gets the name for its converging light effect. It looks as if the light beams are radiating from beneath the camera island. That said, it’s still recessed and both the Red and Blue paint jobs aren’t that flashy. But, I must say, I miss the polygonal effect which embellished the early-gen Realme phones. Besides the camera array, the rear rocks a realme logo as well.
The phone has a smudge-free frictional surface, which offers a nice grip. It’s lite and ergonomic thanks to an all-plastic body. Realme claims the phone is splash resistant, with tightly sealed ports. So, overall the device embodies an industrial build with ample attention to detail. This is important considering its price.
#gallery-0-25 { margin: auto; } #gallery-0-25 .gallery-item { float: left; margin-top: 10px; text-align: center; width: 50%; } #gallery-0-25 img { border: 2px solid #cfcfcf; } #gallery-0-25 .gallery-caption { margin-left: 0; } /* see gallery_shortcode() in wp-includes/media.php */
C3 echoes the same side frame button arrangement as every other Realme phone since day one. You’ll find the volume rockers on the left while the power button sits on the right. The buttons are mushy and plasticky, but that’s to be expected with entry grade phones.
Moving forward, the frontier flaunts a familiar mini drop notched vista. Inside that notch resides a camera that enables Face Unlock. It works fine save for when you try it in a dull or dark ambiance. Not much to say there. But, the real kicker is the absent fingerprint sensor. That means if not for face unlocking, you will have to resort to PIN/Pattern/Password.
The screen here is alright for the price. It’s a 720P panel measuring 6.52 inches, with a 20:9 aspect ratio. It’s good to have that kinda real estate in this segment. That said, this is still a moderate-quality IPS LCD panel.
Realme C3 Review: Performance and Software
This is the portion of the review which you may call as a tasty trifle. Here’s how ( ° ∀ ° )ノ゙
Realme C3 is the first phone to ship with MediaTek G70 silicon and Realme UI software. The former is a pretty powerful chip for handling your daily chores. It fared well in my Asphalt 9 and PUBG sessions. The graphics take a hit for sure with some jank and jitter here and there. However, nothing spoiled the sport for me. Likewise, everything from multitasking, app-switching, and navigation was nippy.
Speaking of navigation, I adore the Android 10‘s gesture-abled movements. There’s plenty to like about the new Android edition. On top of which, you have the Realme UI (review). For the first time, I felt like using the Realme software as it is. It’s a welcome update through and through. If you’d ask me to pick a bone with it, I would point at the remaining few bloatware. Rest, I have gone in-depth about the UI in my dedicated review of it.
This time around, Realme has stowed in more memory, both on the RAM and ROM front. You get to grab the device in 3GB RAM plus 32GB storage variant as well as a higher 4GB RAM plus 64GB storage option. You can max the storage configuration by up to 256gigs using the dedicated SD card slot.
I also run the popular benchmark tests and to my surprise, its scores were in an altogether different league. For instance, Realme C3 has fared better in Antutu benchmarks than pricier peers like Realme 3 Pro, Mi A3, Redmi Note 7, Samsung Galaxy A50, Realme 5 and Redmi Note 8. Here are the results –
#gallery-0-26 { margin: auto; } #gallery-0-26 .gallery-item { float: left; margin-top: 10px; text-align: center; width: 33%; } #gallery-0-26 img { border: 2px solid #cfcfcf; } #gallery-0-26 .gallery-caption { margin-left: 0; } /* see gallery_shortcode() in wp-includes/media.php */
Geekbench 5
3DMark Slingshot Extreme
3DMark Slingshot
Androbench
DRMinfo
PCMark
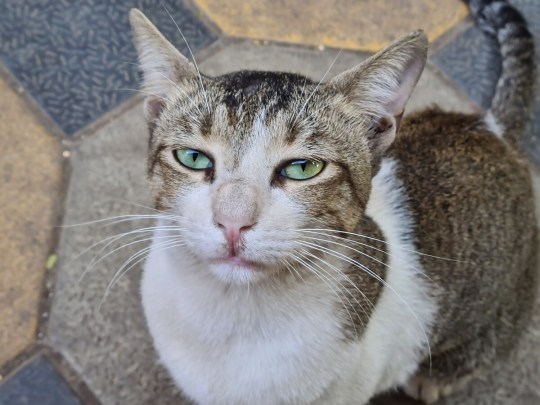
Realme C3 Review: Camera
Realme C3 wields a 12MP (primary) plus 2MP (depth) sensor duo at the back. To the front, we have the same 5MP selfie snapper as found in the predecessor. As a part of the new UI overhaul, the camera app also looks anew.
Coming to the real-world performance, I was quite astonished by some shots I managed to capture out of it.
#gallery-0-27 { margin: auto; } #gallery-0-27 .gallery-item { float: left; margin-top: 10px; text-align: center; width: 33%; } #gallery-0-27 img { border: 2px solid #cfcfcf; } #gallery-0-27 .gallery-caption { margin-left: 0; } /* see gallery_shortcode() in wp-includes/media.php */
If you capture something in close proximity under a good amount of light, then the photos are sharable on social media.
#gallery-0-28 { margin: auto; } #gallery-0-28 .gallery-item { float: left; margin-top: 10px; text-align: center; width: 33%; } #gallery-0-28 img { border: 2px solid #cfcfcf; } #gallery-0-28 .gallery-caption { margin-left: 0; } /* see gallery_shortcode() in wp-includes/media.php */
But, things get tricky when you distance yourself and the light is unfavorable.
#gallery-0-29 { margin: auto; } #gallery-0-29 .gallery-item { float: left; margin-top: 10px; text-align: center; width: 50%; } #gallery-0-29 img { border: 2px solid #cfcfcf; } #gallery-0-29 .gallery-caption { margin-left: 0; } /* see gallery_shortcode() in wp-includes/media.php */
Details are wishy-washy in both shadows, highlights and colors look pale.
The colors are far from natural. Look at the lifeless leaves.
Realme C3 is plagued by the same issues found in similarly priced phones. The details look washed out. The dynamic range is spotty, which means you have to live with crushed shadows and subdued highlights.
#gallery-0-30 { margin: auto; } #gallery-0-30 .gallery-item { float: left; margin-top: 10px; text-align: center; width: 33%; } #gallery-0-30 img { border: 2px solid #cfcfcf; } #gallery-0-30 .gallery-caption { margin-left: 0; } /* see gallery_shortcode() in wp-includes/media.php */
Low light photography would have benefitted Nightscape. Even without it, the photos are serviceable.
If you glance at the human subjects down below, the front and rear cameras have done a pretty decent job. But, mind you the camera does falter in exposure handling, face-tracking and even that portrait blur tends to eat into the subject at times.
#gallery-0-31 { margin: auto; } #gallery-0-31 .gallery-item { float: left; margin-top: 10px; text-align: center; width: 33%; } #gallery-0-31 img { border: 2px solid #cfcfcf; } #gallery-0-31 .gallery-caption { margin-left: 0; } /* see gallery_shortcode() in wp-includes/media.php */
You can shoot up to FHD videos at 30fps and an option to go slo-mo at 480fps. They are okayish and nothing to write home about.
So overall, the optics are certainly capable of handling most everyday requirements, and it’s definitely better than it has any right to be.
Realme C3 Review: Audio, Battery, and Connectivity
Realme C3 has the stamina to pull through an ordinary day. In our endurance test, the 5000mAh battery ran for 8h 26min.
#gallery-0-32 { margin: auto; } #gallery-0-32 .gallery-item { float: left; margin-top: 10px; text-align: center; width: 50%; } #gallery-0-32 img { border: 2px solid #cfcfcf; } #gallery-0-32 .gallery-caption { margin-left: 0; } /* see gallery_shortcode() in wp-includes/media.php */
And when the device begs for a charger, you’ll have to resort to a 10W charger. This is slow as a snail to refill the tank. Look, it’s no surprise, but more like a reminder for the budget. My real grievance is with the micro-USB port. I feel like its high time that even low-trim phones start coming with a USB Type-C.
And yea, Realme has thrown in a reverse charge feature too, in case you care.
The micro-USB socket is flanked by a 3.5mm headphone jack (I’m not one to take it for granted!) and a single speaker grille. The audio output is tiny without any texture.
The Dual-SIM phone serves its purpose as a phone with fine call reception. The person, on the other hand, too had no problem hearing my euphonious voice.
Amongst other things, you also get Bluetooth 5.0 with support for audio codecs like SBC, AAC, APTX, LDAC. (Nice!) You’ll appreciate these acronyms while listening over a wireless earphone.
Realme C3 Review: Closing Thoughts!
When you buy a budget handset, you look forward to the essentials. You want everything that matters and nothing that doesn’t. So, my review quest was to test out the performance, and see whether the overall offering is value-packed or not?
Yes, It is! I am fairly satisfied.
It’s given that a top-dollar item will give you the most phone. But it’s impressive when a phone hits the spot without costing an arm or a leg. Thus, being on a budget doesn’t mean you can’t enjoy a decent smartphone experience. The newly launched Realme C3 is inexpensive and still appears to tick most boxes. It is the first phone with the MediaTek G70 and the first phone to offer Android 10 for under Rs. 10,000.
Although Realme C3 is cheap as chips starting at Rs. 6,999, I appreciate the fact it didn’t stop me from doing anything that I wanted to do.
Pros
Respectable performance and UX
Battery mileage
Good photos under favorable conditions
Cons
MicroUSB
Audio
Camera fails under challenging light and long-range
Realme C3 Review These days, you don't have to pay large to experience a smart smartphone. Even if you're penny-pinching, the budget contenders could prove an appealing worth.
0 notes
Text
Solving Problems With CSS Grid: The Gantt Chart
We recently published a tutorial explaining how to build a JavaScript-driven Gantt Chart. I think it’s the perfect case study for CSS Grid, so in this tutorial we’ll see how well suited CSS Grid Layout is for building a flexible Gantt Chart.
Our CSS Grid Gantt Chart
Here’s what we’re building. It uses CSS Grid to lay out the labels, dividing lines, and tasks. And it uses line names to help us define the task durations in a human-readable way.
For the complete effect, check out the fullscreen version and play with its fluid layout.
If you need a quick refresher on how to use CSS Grid, this guide will get you started:
CSS Grid Layout
CSS Grid Layout: A Quick Start Guide
Ian Yates
Reminder: What Exactly is a Gantt Chart?
Henry Gantt was a mechanical engineer who, in the lead up to The Great War (as it was known before the need to number them arose) was tasked with project managing the American military and munitions. This was quite a meaty undertaking, so he used his own way of visualizing all the relevant jobs, their timelines, and designated responsibilities. Ladies and gentlemen, the Gantt Chart:
A detailed sketch of a Gantt chart
Right then, that’s enough preamble. Let’s build a Gantt chart with CSS Grid.
1. Begin with Some Markup
We’ll need a few elements for our chart. Look at this highly accurate diagram and all will become clear:
You can see we’ll need headers for our days, lines to divide the columns up, the tasks themselves, and probably a wrapper around the whole thing. So we’ll begin with the wrapper:
<div class="gantt"> </div>
This will serve as our grid, so we’ll need to say so in our first CSS declaration (along with some other stylistic bits and pieces):
.gantt { display: grid; grid-template-columns: repeat(14, 1fr); grid-gap: 10px 0px; width: 100%; max-width: 1150px; padding-top: 40px; margin: 0 auto; }
You’ll notice we’ve declared the columns for our grid here, but I’ve said we want 14 of them with repeat(14, 1fr). You might think we’d need 7 (one for each day) but I’d like each day to be split in two so we can have tasks starting and ending in the middle of the day.
Also worth noting: we’ve added grid-gap: 10px 0px; which gives us 10px of grid gap top and bottom, but nothing to the left and right. This will space out our tasks vertically.
2. Add Some Headings and Lines
Without content we’ve literally nothing to see yet, so let’s add some headings (our days) and the dividing lines.
<div class="gantt"> <span class="d-1"></span> <span class="d-2"></span> <span class="d-3"></span> <span class="d-4"></span> <span class="d-5"></span> <span class="d-6"></span> <h3 class="h-sun">sun</h3> <h3 class="h-mon">mon</h3> <h3 class="h-tue">tue</h3> <h3 class="h-wed">wed</h3> <h3 class="h-thu">thu</h3> <h3 class="h-fri">fri</h3> <h3 class="h-sat">sat</h3> </div>
This might look a little heavy-handed, but we’re going to be laying some elements on the same grid coordinates as others–grid’s auto-placement won’t help us with that, so we’ll need to individually select most of the items.
On the next exquisitely crafted drawing you’ll see that our headings are each spanning two columns, and the dividing lines are positioned two columns away from one another as well.
Our Tuesday heading, for example, is positioned on grid column line 5; so too is the dividing line between it and Monday.
Here we have some styles for our dividers, including a grid-column rule for each one to position it on the right grid line. We also need to make sure they span down all the rows we’ll need:
/* dividers */ span { border-left: 1px solid lightgrey; grid-row: 1 / span 10; } span.d-1 { grid-column: 3; } span.d-2 { grid-column: 5; } span.d-3 { grid-column: 7; } span.d-4 { grid-column: 9; } span.d-5 { grid-column: 11; } span.d-6 { grid-column: 13; }
Next we do something similar for the headings. You’ll notice that these grid-column declarations include the span keyword to make each heading span across two columns.
/* days */ h3 { text-align: center; grid-row: 1; } h3.h-sun { grid-column: 1 / span 2; } h3.h-mon { grid-column: 3 / span 2; } h3.h-tue { grid-column: 5 / span 2; } h3.h-wed { grid-column: 7 / span 2; } h3.h-thu { grid-column: 9 / span 2; } h3.h-fri { grid-column: 11 / span 2; } h3.h-sat { grid-column: 13 / span 2; }
Now we actually have something to look at!
3. Add Some Tasks
Our tasks are a pile of div elements. I’ve included their grid-column values inline because in a real world scenario these would probably be added to the markup somehow, rather than the stylesheets.
<div class="t-1" style="grid-column: 1 / span 4;">Take the badger for a walk</div> <div class="t-2" style="grid-column: 3 / span 12;">Manufacture some cheese</div> <div class="t-3" style="grid-column: 1 / span 5;">Prepare talk on foot hygiene</div> <div class="t-4" style="grid-column: 6 / span 3;">Sleep</div> <div class="t-5" style="grid-column: 3 / span 3;">Photograph breakfast</div> <div class="t-6" style="grid-column: 4 / span 6;">Paint the inside of the refrigerator</div> <div class="t-7" style="grid-column: 6 / span 9;">Sail to Madagascar</div> <div class="t-8" style="grid-column: 8 / span 1;">Sleep</div> <div class="t-9" style="grid-column: 10 / span 5;">Plan the following week’s tasks</div>
Without doing anything else we’ll already have these divs more or less positioned correctly on our Gantt chart. Saying that, some more styles are needed:
/* tasks */ .gantt div { color: white; font-size: 12px; padding: 10px 20px; border-radius: 20px; } @media only screen and (min-width: 600px) { .gantt div { font-size: 16px; } }
These styles give our tasks some basic sizing, with a media query to increase the font-size on larger screens. Next we need the styles to give each task a background color and a specific row number. Without these grid-row rules CSS Grid Layout’s auto-placement would get to work and put our tasks wherever it saw fit (not ideal).
/* specific task styles */ .t-1 { background: #b03532; grid-row: 2; } .t-2 { background: #33a8a5; grid-row: 3; } .t-3 { background: #30997a; grid-row: 4; } .t-4 { background: #6a478f; grid-row: 5; } .t-5 { background: #da6f2b; grid-row: 6; } .t-6 { background: #3d8bb1; grid-row: 7; } .t-7 { background: #e03f3f; grid-row: 8; } .t-8 { background: #59a627; grid-row: 9; } .t-9 { background: #4464a1; grid-row: 10; }
With that done, we have ourselves a flexible Gantt chart!
4. Improvement: Name the Grid Lines
As I’ve mentioned before, it’s a good idea to give your grid lines names. Our Gantt chart is the perfect example of where that’s especially true.
CSS Grid Layout
Quick Tip: Name Your CSS Grid Lines, Just in Case
Ian Yates
When we’re positioning our tasks on the chart, having to visualize the grid line numbers is a clumsy way of doing things. It would be much easier if we could say, in a human way, at what point our tasks begin and end.
Let’s try this:
If we use a system like this we could say that a task “starts on Tuesday midday, then finishes on Thursday morning” for example.
We’ll begin by redefining our grid, this time wrapping each of our 14 columns in a line name:
.gantt { display: grid; grid-template-columns: [sun-morning] 1fr [sun-midday] 1fr [sun-night
Ah, now we’re stuck. We’ve named grid line 1 sun-morning, line 2 sun-midday, and line 3 sun-night. But line 3 is actually more than just Sunday night, it’s also Monday morning, depending on how you look at it.
Luckily, we can assign more than one name to a grid line, so we’ll name it sun-night mon-morning. Continue on, naming all the lines as you go.
.gantt { display: grid; grid-template-columns: [sun-morning] 1fr [sun-midday] 1fr [sun-night mon-morning] 1fr [mon-midday] 1fr [mon-night tue-morning] 1fr [tue-midday] 1fr [tue-night wed-morning] 1fr [wed-midday] 1fr [wed-night thu-morning] 1fr [thu-midday] 1fr [thu-night fri-morning] 1fr [fri-midday] 1fr [fri-night sat-morning] 1fr [sat-midday] 1fr [sat-night];
Now we need to change the way our tasks are positioned in the markup. We can define them all like this:
grid-column: mon-morning / sat-night;
How clear is that?! Here’s what we end up with:
Conclusion
And we’re done. We’ve used CSS Grid Layout to create a flexible Gantt chart. Not only that, we made the code human-readable to make organizing the chart data even easier.
If you want to take your own Gantt chart to the next level and you need some inspiration, take a look at Phil’s concept on CodePen (it’s a beauty):
Gantt Chart Concept with CSS-Grid
If you have any questions or suggestions, let us know in the comments!
More Project-Based CSS Grid Tutorials
Nothing teaches better than “doing”.
CSS Grid Layout
Solving Problems With CSS Grid and Flexbox: The Card UI
Ian Yates
CSS Grid Layout
Create a CSS Grid Image Gallery (With Blur Effect and Interaction Media Queries)
Ian Yates
CSS Grid Layout
Create a Broken Grid Layout Using CSS Grid
Ian Yates
CSS Grid Layout
Merry Gridmas! Building a Festive Advent Calendar With CSS Grid
Ian Yates
0 notes
Note
hey andy, which version of HOD is the highest quality version? What are the differences between the two? Is something missing from one version and visible in the other? Can you give examples? Thanks
Okay, so people often assume the Playstation version is best. Because it has “more colors.”
However, the visual difference (especially for the 2D in-game visuals) barely matters. You’ll notice there is a difference, but in the game itself the PC version isn’t inferior at all. I even prefer the brighter color choices in the cinematics of the PC version over the PS1 version. There’s more color depth in the PS1 version, but I find the colors less vibrant. There’s also jpeg artifacts that get rendered in, which are visible in large stretches of solid color.
(I’ll see about putting screenshots here soon. Getting PS1 screenshots in an emulator that aren’t stretched can be a challenge though)
Where the differences really occur, is actually getting the game to play and getting a good visual result.
Despite it taking a bit of messing around sometimes to properly install and run the game (I use DxWnd to run it in a window instead of fullscreen which is required otherwise) the PC version is by far the easiest to get looking nice and running correctly.
Especially noticeable in emulators (oh boy, we’ll get more in depth on them later) the PS1 version will often stretch to fit a resolution it shouldn't. This causes the 2D screens to appear blurry and smudgy. This is common for 2D PS1 games. Many emulators have features built in and running by default that optimize the emulator for 3D games. These obviously don’t click well with 2D ones.
The way the PC version resizes to fit fullscreen, it doesn’t change its resolution, making the sprites look crisp and clean. Using DxWnd it can also be in the intended resolution of 640x480. (this measurement includes the black borders that accommodate the screen-shake in various levels)
This means that you’re going to get a good visual in the PC version no matter what. Unless of course there’s a graphical issue with your version of direct X and/or what version of Windows you use. Sometimes you’ll get the graphics looking like weird vomit colors. This can usually be fixed by creating a bat file that closes windows explorer when the game is run, but since windows 10 we see this less and less happening.
As for playability, I’ve had a ton of issues with the PS1 version of Heart of Darkness in emulators, and the PC version plays a bit better in Modern 64 bit Windows than Modern 32 bit. No clue why for that.
Some people swear certain emulators run Heart of Darkness just fine, but most of these good ones (because they are frequently updated) are command line programs, and I don’t like to use command line programs for emulation. I’m lazy. So I haven’t tested every single emulator to the best of its ability.
Various forms of emulation from what I’ve personally experienced:
I consider Heart of Darkness unplayable on PS3. Lots of issues with things like input lag, enemy spawns, hitboxes, reading from disc(?), etc. Seen a save file corrupting glitch before too.
ePSXe - every few years I try to get somewhere with this emulator and it never works right no matter how I mess with it.
The emulator used in the PlayStation Classic I’ve been told emulates HoD very well but I’ve never gotten around to personally testing it yet.
Differences between versions:
There were six official dubs: French, English, German, Spanish, Italian, and Japanese. Their quality is consistent across the board with slight changes based on voice actor and translation. I’ve been told the French dub is significantly better than the English dub in terms of writing. I’m not fluent enough to judge. The experience with these versions is largely the same. HOWEVER…
The North American version (in English) for both PS1 and PC is censored. In order to have the E rating a total of ONE thing had to be removed.
Now let it be known that this game is French. People in France see nothing wrong with a tiddy. Tiddies are just a thing. Who cares?
America cares. Just like the Tumblr staff, America gasps and covers its eyes at the mere MENTION of a tiddy.
There’s a scene in the cinematic where Amigo takes Andy back to his village on the floating island and the elder shows a drawing of a lady amigo. In the American version there is no nip. That’s the literal only difference.
Despite all the whinging and crying about how gory and violent the deaths apparently are, only alien tiddy was censored. The more you know! 🌠
So, if the censorship of alien tiddy is something you’d like to avoid, best be going with the UK English version.
HOWEVER, if you don’t need the game to be in English or you are just going to skip/ignore the cinematics anyways, the best edition of the PC version is the 2001 French collectors edition. It installs the best on modern Windows, and comes with a digital manual so there’s no excuse not knowing how the controls work.
Also bear in mind that the cinematics are contained to the disc. Meaning you can install a version that runs on your PC better, then mount a different language version in the virtual CD drive, and it works. Just the menus and hints will be in the original language.
So in closing, the PlayStation version most people will say is the best, but you need to be aware of common emulator issues, and the things that make the PlayStation version better aren’t as big of a deal as you’d assume them to be. I strongly prefer playing the PC version when it comes down to convenience and accessibility. I’d imagine the PS1 version would be amazing on original hardware with a capture card though.
the PC French collectors edition is seen as the definitive version of the game.
0 notes